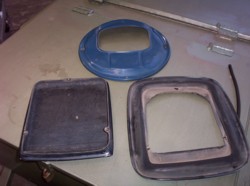
Fitting an AussieSpeed alloy GT Shaker to a reproduction fibre glass shaker assembly.
Here is something that will lift your ride; how about fitting one of our GT shaker lids to your old beaten up fibre glass one.
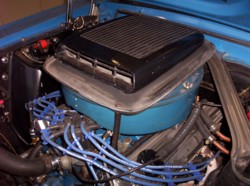
Interesting enough, I will bet you have probably not had it apart in a while and have forgotten how rough it is, I know I did. Now I have not a clue who originally made this one, I brought it from a swap meet many years ago and it has been on my 1967 Mustang for along time. You can see from these photos how the rubber that is between the shaker top and the air cleaner lid hides the poor fit. The good news is this rubber will aid our conversion too because it will be no better fit than it was before.
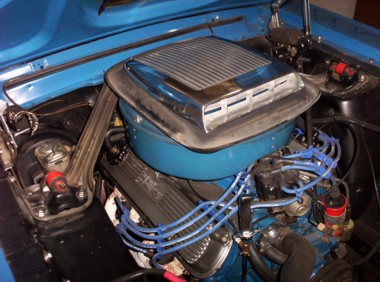
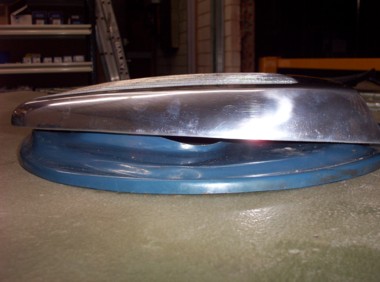
Now remember we are not trying to produce a concourse imitation here, what we are doing is tricking up our daily hack or keeping within our budget and having some fun by spending as little as possible, in essence all we are after is the cool look for a little outlay. As you can see from the photos our Stang has been on the road for a while and it is a bitza anyway [bits of this & bits of that, had a rough previous life] but I look after it as much as can and I like to tinker around with it. Now the following photos show how the alloy GT shaker does not follow the contours of the air cleaner lid either but at least it is straight and square so it will be an improvement on what it was.
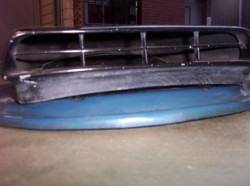
Here we show the 3 parts to the top assembly and the difference between the two Shaker tops.
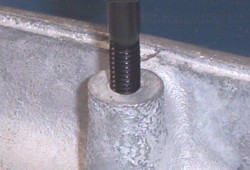
The solution for fitting the new Shaker top to the old air cleaner lid is to use some 5/16 UNC all thread to space the alloy Shaker away from the old lid so that the rubber gets clamped nicely between the two. You will need to redrill the old air cleaner lid to suit the new shaker. The all thread allows you to adjust the clamping of the rubber which will pull it nicely into shape.
Use large diameter washers on the fibre glass lid so as to spread the load and avoid cracking the old lid because you will find they are very thin. Use nuts on the between side to tighten up on so that the clamping forces are not trying to pull the old air cleaner lid out of shape, towards the shaker top. By adjusting where these between nuts sit you can get the new shaker to clamp down a little on the rubber. It squares up the rubber nicely once you have tightened up the bottom nut that clamps the old air cleaner lid to this between nut, remember to use some big washers.
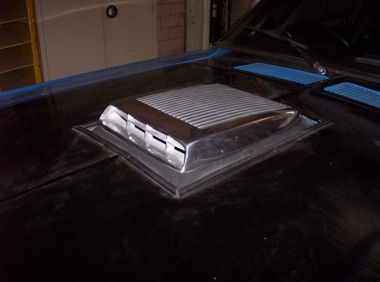
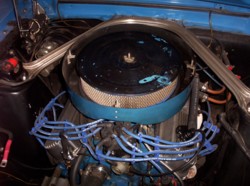
So there you have it, all done. I fitted a polished unit here to really show the contrast and it looks good against the blacked out bonnet on the Stang. This took about an hour to do, it is not hard and it was kinda fun. Looking at the dust on the bonnet I think I will go and wash it now.
Click on this Mustang photo to see larger
GT Shaker Retrofit Article
There are no products to display
Want to know more
Follow our workshop projects, new products, news and events on Facebook.
Kustom Bitz is doing an EV conversion on this 1955 MG ZA Magnette. The job is a complete restoration and driveline conversion, it doen't look much at the moment but we have been pulling it apart to completely strip the paint for a full rotiserie restoration on the body. The sills need replacing and the rear guards need some rust repairs but apart from that the body is mint.
You can follow the restoration on https://www.facebook.com/MGEVMagnette
We will be installing an air cooled Hyper9 AC motor and controller with two LFP battery packs, one in the boot and one in the front engine bay. The electric motor will sit in the gearbox tunnel with a Torque Trends USA Long tail housing reduction box, with integral park lock, like an auto trans has.
The base EV technology that is going into this car has been around since the 1990s and I have been selecting, repairing and working on IGBT drive technolgy in the automation industry since that time, so combining my restoration skills and EV technology make sense to me.
Intended as a city run around it should be a pretty stout combination as the Hyper9 puts out a similar torque to a stock 289 Windsor but from zero rpm all the way up. Rated at approx 200hp. The body is light weight at just on 1080kg stock, weight gets pulled out, engine and gear box [all cast iron], and the batteries is similar in weight so ends up around the same once finished.
You would think a supercharger kit install would be pretty simple .... well no, is the short answer.
A wise man once told me a 'kit' is not a solution. And having worked on a few of these set ups now these words keep ringing in my head and I remember this old man who at the time I didn't think was that wise at all .... now I am older and I see.
In this install I had to port match the heads to the intake as there was a substantial lip into the head port because of the large intake manifold ports. If not corrected would have led to fuel puddling and fouled plugs and drivability problems that would have been hard to diagnose once assembled. Also the distributor hole at the back of the manifold was off centre and way too big for a standard chevy dizzy and any aftermarket dizzy too. So I had to make a boss to take up the slack and provide a stable boss for the dizzy clamp to work properly.
To add to the woes, the engine assembler failed to pick up that it was a tall deck block and required a longer oil pump drive shaft .... that was hard to diagnose when a new engine loses oil pressure for no reason.
I got there in the end with modded accelerator links, better fuel line route, boost referenced carburettors and a proper harmonic balancer for a blower application. The install was challenging on this one but the end result was a sweet running engine with monster amounts of torque to hall this heavy full size sedan around the hills .... and cool looks of course.
41 Willy Coupe chassis fabricated to original dimensions yet extra strength provided in the depth of the chassis and via tubular centre X member and many tubular cross members to take the weight and torque of a big block Ford drive line. This chassis will have an original steel body fitted to it and the owner wants the whole car to resemble an early 60s drag car, right down to the rear radius rods that look like ladder bars, however it has to have nice street manners and pass ASRF construction guidelines for safe street rod engineering. Now many may argue a leaf sprung front end and rear end is not the best handling street car and I would agree, but there are always trade offs for the look you want and the right combination of parts installed with the correct geometry can still yield a very nice driver with a really cool look. When driven responsibly this 41 Willys will provide hours of enjoyment for the owner cruising around.
Chassis by Kustom Bitz [our custom designed rails], Engine Ford Hemi V8, T400 auto, 9" diff installed on leaf springs with diff housing floaters designed by Kustom Bitz for street use [so we have flexibility and suspension give], Super Bell front I beam with disc brakes cleverly mounted to parallel leaf springs without any mods to I beam and not relying on welded parts.
See our section on Hot Rod Chassis construction for more images of our various Willys Coupe chassis that Kustom Bitz has built.
The Toyota Crown ute is progressing along, the body is fitting the modified original chassis and this is how it will look when it's dropped ... I think it has the right stance ... The framing you can see is holding the upper body together as the floor and lower sections are rusted away and have been cut out, then to be completely refabbed by us. The frame allows us to lift the body on and off as we please during this stage.
Kustom Bitz just completed a 35-41 chassis, stepped up at the rear and a reversed centre X member allow this chassis to sit 40mm off the deck. It runs a Rod Tech IFS, big block chevy and L80E auto, a 9 inch diff with floating hubs, all on modified original rails. Kustom Bitz has developed our own boxing plates that suit the original rails near on perfectly. Original Ford rails are curved from front to back there are no straight sections, so to get something that fits right we had to jig the chassis up and map them out. This is what we do, when it just needs to be done right to make it a well engineered car. This allowed us to make a nice transistion for a high step at the rear. We have designed in 6 inches of travel at the back, so this car can have a normal, almost stock ride height then dumped to the max when parked.
'67 Toyota Crown ute chassis build is going well. Got the LS engine and 6 speed manual box in place and we can use all the orginal serpentine pulleys, brackets etc. The narrow wheel track on the Toyota called for a tailored solution when it came to the front end. These old Toyotas dont have service parts available any more so the front end had to be changed, so that made a brake upgrade alot easier too. We run R6 air bags from Air Ride sitting at a ride height of 6" for the air bag so got plenty of air volume in them for a good ride quality and a full length travel shock absorber so we get proper rebound tuning, along with a power steering rack. So at the sill [belly of the car] we get a 5" ride hieght with a 4 inch drop, this thing will look great.
Recently in Victoria some engineers have called for the upper and lower mounts for the rear coil over shockers to be a double shear bracket. The thoery is that the bolt has too much twisting force on it and it will break. Well thats why on Hot Rods we use a 5/8" grade 8 bolt in a single shear bracket application to over engineer it so it does not break. A typical OEM application uses a 1/2" bolt in a double shear bracket. However to please the engineer we have thought out a simple plate kit that can be welded in on the upper mounts as you see here to satisfy their requirements and should fit into most applications without too much effort or rework. We have a lower mount bracket nutted out as well.
So many hot rod shops don't install proper bump stops. In this instance we had to rebuild the shocker mounts on the diff as the rear end was bottoming out on the shocker travel becasue it had no properly designed bump stops in place. So the shock absorber mounting bracket was absorbing every bump when the suspension bottomed out, easy to see why both mounts broke.
While we were repairing the diff I made a simple yet effective progressive bump stop that is held in place via the U bolts that hold the diff to the leaf springs. It turned out a very successful set up.
This is yet another example how Kustom Bitz can sort out problems on your custom car or hot rod, its what we do.
Back in the day Group C racing one of the tricks to get the Holden Torana to handle nice and be more predictable in corners was to fit a rear pan hard bar to give much better diff locating than the OEM triangulated 4 bars offered. However the body, subframe and floor pan at the rear is no where near strong enoungh to concentrate the loads of pan hard bar in any one spot, so it has to be carefully planned and constructed, especially so in a street car like this that we cannot put a full roll cage in. You see in a race car I can place the roll cage in a position to pick up such loads placed on the pan hard bar brackets, but in this situaton we couldn't.
The picture above is with the unit installed, keep in mind the car was just a shell so no weight was in it and the rear is sitting high. Once the full wieght of the car is on, it will sit fairly level. It retains the original triangulated 4 bars however we run PU bushes in the bottom arms and ordinary rubber in the top arms. So the lower arms and pan hard bar do the locating and the top arms have some give so they don't bind with the pan hard bar.


.jpg)